Simple Steps To Your First Basic Aeroplane Drawing Today
Detail Author:
- Name : Mr. Vicente Franecki
- Username : bart59
- Email : ceasar.crona@yahoo.com
- Birthdate : 1986-07-16
- Address : 76136 Jeremy Heights Suite 450 New Jesusside, AR 54506-8409
- Phone : 616.534.7503
- Company : Goyette-Hansen
- Job : Waitress
- Bio : Molestiae voluptatem perferendis ducimus ut tempore ex nesciunt. Beatae velit quia sapiente voluptate doloribus enim. Labore recusandae quo quia. Et dolor voluptatum eveniet.
Socials
linkedin:
- url : https://linkedin.com/in/feesto
- username : feesto
- bio : Placeat et excepturi ab voluptatem qui dolorum.
- followers : 1357
- following : 1818
facebook:
- url : https://facebook.com/ona7494
- username : ona7494
- bio : Corrupti consequuntur quasi eaque molestiae ex.
- followers : 5953
- following : 309
instagram:
- url : https://instagram.com/feest1989
- username : feest1989
- bio : Rerum sit sit earum. Reprehenderit eius et enim iste aperiam.
- followers : 2815
- following : 1042
Have you ever looked up at the sky, seen an aeroplane soaring high, and wished you could capture that feeling on paper? Maybe you just want a fun, simple creative outlet. Learning a basic aeroplane drawing is a truly wonderful way to start your artistic adventure, and it’s a skill anyone can pick up, really. It doesn't matter if you think you can't draw a straight line; we are going to make this very simple for you, you know.
Starting with something "basic" is, in some respects, a lot like learning the ABCs before writing a novel. It's about building a solid foundation, a base, you could say. Think about how many big things started with something simple, like the programming language BASIC that helped many early computer systems get going. It was a straightforward beginning that led to much more complex creations, and that's precisely how we'll approach your aeroplane drawing, more or less.
By the end of this guide, you will have the confidence and the steps to sketch a charming aeroplane. This isn't about creating a masterpiece for a museum, you see. It's about enjoying the process, feeling good about what you make, and having a cool aeroplane drawing to show for it. So, grab your pencil and paper; it's time to get started, you know?
Table of Contents
- Why Start with Basic Aeroplane Drawing?
- Getting Ready: Your Simple Drawing Tools
- Step-by-Step Guide to Your Basic Aeroplane Drawing
- Tips for Making Your Aeroplane Drawing Soar
- Common Questions About Drawing Aeroplanes
- Ready to Take Off? Your Next Steps in Drawing
Why Start with Basic Aeroplane Drawing?
There's something universally appealing about aeroplanes, isn't there? They symbolize freedom, travel, and maybe a bit of adventure. For someone just starting to draw, an aeroplane is a perfect subject. It has clear, simple shapes that are easy to break down, which is very helpful for beginners, you know.
Choosing a basic aeroplane drawing as your starting point helps build confidence, too. When you see your simple lines come together to form a recognizable object, it feels pretty good. This feeling encourages you to keep going, to try new things, and maybe even tackle more complex drawings later on, which is actually how many artists get their start.
Plus, drawing aeroplanes is just plain fun. Whether you are sketching a speedy jet or a cute, cartoon-like prop plane, there's a lot of room for your own touch. It’s a nice way to spend some quiet time, letting your imagination take flight, you know. It's truly a relaxing activity, and you might find it quite calming.
Getting Ready: Your Simple Drawing Tools
You don't need a fancy art studio or expensive supplies to get started with a basic aeroplane drawing. In fact, keeping it simple is part of the charm, honestly. All you really need are a few basic items that you probably already have lying around your home, or that are very easy to find, as a matter of fact.
Grab a pencil – any pencil will do, though a regular HB pencil is often a good choice. You will also want some paper, just plain printer paper or a simple sketchpad works perfectly. And, of course, an eraser is always a good idea for those little adjustments you might want to make, you know. That's really all you need to begin your aeroplane drawing adventure today, pretty much.
Some people like to have a ruler for drawing straight lines, especially for wings or the fuselage, and that's fine too. But for a truly basic aeroplane drawing, we will focus on freehand sketching. This helps you get a feel for the shapes without relying too much on tools, which is kind of important for developing your hand-eye coordination, you know.
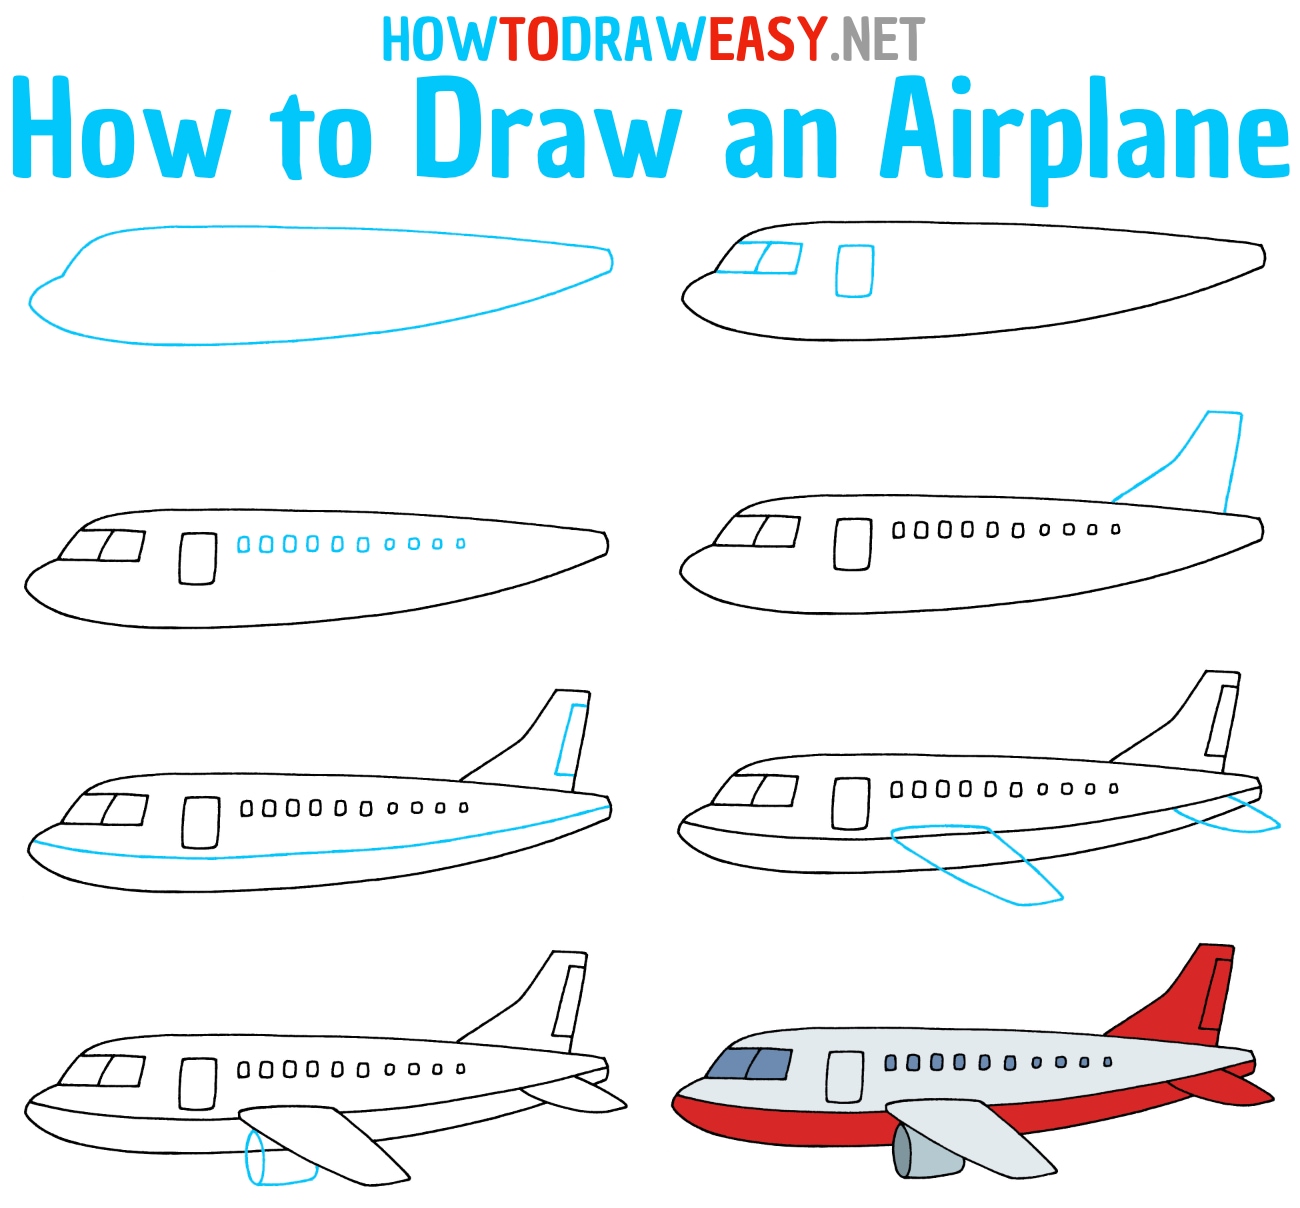
Step-by-Step Guide to Your Basic Aeroplane Drawing
Alright, let's get down to the fun part: drawing your aeroplane! We will go through this step by step, taking it easy, so you can follow along at your own speed. Remember, this is about enjoying the process and getting a feel for the shapes, so don't worry about perfection, you know.
Think of each step as building a small piece of a puzzle. When all the pieces come together, you will have your aeroplane. We are going to use simple shapes like ovals, rectangles, and triangles to form our aircraft, which is a very common approach in drawing, you know.
Today is October 26, 2023, and it's a great day to start a new creative hobby. Let's make some art together, shall we? You'll be surprised how quickly you get the hang of it, honestly.
Step 1: The Main Body Shape
Start by drawing a long, somewhat slender oval or a shape that looks a bit like a sausage. This will be the main body, or fuselage, of your aeroplane, you see. Don't press too hard with your pencil just yet; use light, sketch lines that you can easily erase later, you know.
This shape doesn't have to be perfectly symmetrical, not at all. Just aim for something that feels right for the body of a plane. You can make it longer for a passenger jet or a little shorter and rounder for a smaller plane, you know. It's your drawing, after all, and you can make it pretty much any way you like.
This initial shape is the core of your aeroplane. It's the base from which everything else will grow, just like how a simple "basic" command was the starting point for complex computer programs, in a way. So, take your time with this first step, you know.
Step 2: Adding the Wings
Next, we will add the wings. For a basic aeroplane drawing, think of the main wings as two long, flattened oval or rectangular shapes extending from the sides of your body shape. Place them roughly in the middle of the fuselage, maybe a little towards the front, you know.
Make sure they stick out on both sides, kind of mirroring each other. You can make them straight or give them a slight angle, pointing a little upwards or downwards, depending on the type of plane you have in mind. This step really starts to make your drawing look like an aeroplane, you know.
Remember to keep your lines light for now. We will refine them later. This is just about getting the main parts in place, like putting together the big pieces of a model kit, so to speak. You're doing great, honestly.
Step 3: The Tail Assembly
Now, let's give your aeroplane a tail. The tail assembly usually has two parts: a horizontal stabilizer and a vertical fin. For the horizontal part, draw a smaller, flattened oval or rectangle near the back of the main body, just like the main wings, but smaller, you know.
Then, for the vertical fin, draw a triangular or somewhat rounded fin shape sticking up from the top of the main body, right above where you drew the horizontal tail piece. This gives the aeroplane its steering and stability, you see. It's a pretty important part of the overall look, actually.
These tail pieces don't need to be perfectly sharp or detailed for a basic drawing. Simple shapes are completely fine. You are building the basic form, and that's what matters most right now, you know. You're doing really well, honestly.
Step 4: Landing Gear and Details
Time to add the landing gear, if your aeroplane is on the ground. For a basic drawing, simple lines with circles at the end work perfectly for wheels. You can draw two wheels under the main wings and one smaller wheel near the tail or under the nose, you know.
Then, let's add some simple details. Draw a small circle or oval at the front for the cockpit window. You can add a few small rectangles or circles along the side of the fuselage for windows, if you like. If it's a propeller plane, draw a simple propeller at the very front using a few curved lines, you know.
For a jet, you might sketch some simple engine pods under the wings, perhaps as small cylinders or rounded rectangles. These little touches really bring your basic aeroplane drawing to life, you know. They add character without adding too much complexity, which is pretty cool.
Step 5: Finishing Touches and Personal Flair
Once you have all the main parts in place, it's time to go over your lines. Now you can press a little harder with your pencil to make the lines you want to keep stand out. Use your eraser to gently remove any extra sketch lines or mistakes you made earlier, you know.
You can also add a bit of shading if you want to give your aeroplane some depth. Maybe shade the underside of the wings or the fuselage a little bit. You could also add some clouds in the background, or a simple horizon line to show it's flying, you know. These are just ideas, of course.
This is where you can really make your drawing your own. Add some stripes, a number, or even a little smiling face on the nose cone if you're going for a cartoon look. Have fun with it, that's the main thing, you know. It's your creation, after all, and you can make it pretty much any way you like.
Tips for Making Your Aeroplane Drawing Soar
Getting started with a basic aeroplane drawing is just the beginning. To really enjoy and improve your drawing, there are a few simple things you can keep in mind. These tips are about making the process more fun and helping you feel more confident with your skills, you know.
Drawing is a skill that grows with practice, like learning to play an instrument or speaking a new language. The more you do it, the better you get, and that's a pretty satisfying feeling. So, don't be afraid to keep sketching, you know.
Practice Makes Progress
The more you draw, the more comfortable you will become with your pencil and paper. Try drawing an aeroplane every day for a week, or even just a few times a week. You will notice a difference in your lines and shapes, honestly. It's pretty amazing how quickly your hand gets used to it, you know.
Don't worry about making every drawing perfect. The goal is to simply draw. Each time you put your pencil to paper, you are learning something new, even if you don't realize it. It's all about building that muscle memory, you know, and just enjoying the process, which is really what art is about, pretty much.
Try drawing the same aeroplane several times, or try drawing different types of aeroplanes. You might find that some shapes feel easier to draw than others, which is totally normal. Just keep at it, and you'll see progress, you know.
Look at Real Planes
When you are out and about, or even just looking online, take a moment to observe real aeroplanes. Notice their shapes, where the wings attach, how the tail looks, and where the engines are. You don't need to draw them right away, just observe, you know.
This helps your brain build a visual library of what aeroplanes look like. Then, when you sit down to draw, you will have a better sense of how the parts fit together. It's like collecting information without even trying too hard, you know. This kind of casual observation can be incredibly helpful for your drawing, actually.
You might notice little details you hadn't thought about before, like the way the light catches a wing, or the curve of the fuselage. These observations can inspire new ideas for your own basic aeroplane drawing, which is pretty cool, you know.
Try Different Styles
Once you are comfortable with a basic aeroplane drawing, try experimenting with different styles. You could try drawing a very simple, almost cartoon-like aeroplane with big eyes and a smile, for example. Or, you might try to make one that looks a bit more realistic, with more detailed lines, you know.
There are so many ways to draw an aeroplane. You could draw one from the side, from the front, or even from above, looking down. Each angle presents a new, fun challenge, and helps you understand the object better, which is kind of neat, you know. It's all about playing around and seeing what you like.
Don't feel like you have to stick to one way of drawing. The beauty of art is that there are endless possibilities. So, go ahead and explore; see what kind of aeroplanes you can create, you know. You might surprise yourself with what you come up with, honestly.
Don't Be Afraid to Experiment
Drawing is a journey of discovery, not just about getting it "right." If a line doesn't look quite right, just erase it and try again. Or, even better, sometimes a "mistake" can lead to a really interesting and unique drawing, you know. So, don't be scared to try new things, actually.
Try using different types of pencils, or maybe even add some color with crayons or colored pencils once your basic drawing is done. See how different tools change the look and feel of your aeroplane. It's all part of the fun, you know, and it helps you find what works best for you, pretty much.
Remember, every artist started somewhere, and everyone makes drawings that aren't "perfect." The most important thing is to keep enjoying the process and to keep creating. Your basic aeroplane drawing is just the beginning of many wonderful things you can create, you know. Just keep trying, and you'll get there.
Common Questions About Drawing Aeroplanes
People often have similar questions when they are starting out with drawing, especially something like an aeroplane. Here are some common thoughts and some simple answers to help you along your way, you know.
What's the easiest way to draw an airplane?
The easiest way to draw an aeroplane is to break it down into very simple shapes. Start with a long oval for the body, then add flat rectangles for the wings and tail, you know. Think of it like building with blocks, one piece at a time. This method makes it very approachable for anyone, honestly.
What materials do I need for basic drawing?
For a basic aeroplane drawing, all you truly need is a pencil and some paper, you know. An eraser is also very helpful for making adjustments. You don't need anything fancy or expensive to get started, which is pretty great. Simple tools are often the best for learning, actually.
How can I make my plane drawing look more realistic?
To make your plane drawing look a bit more realistic, you can start by refining your basic shapes. Add more precise curves, consider perspective (how things look from different angles), and maybe add some light shading to give it depth, you know. Looking at real photos of planes can also give you ideas for details like windows, doors, and engine shapes. But for a basic drawing, simple is fine, you know.
Ready to Take Off? Your Next Steps in Drawing
You've now got the tools and the steps to create your very own basic aeroplane drawing. It's a wonderful feeling to bring something to life on paper, isn't it? This simple act of drawing can open up a whole new world of creative expression for you, honestly.
Keep practicing, keep exploring, and most importantly, keep having fun with your drawing. Remember that every great artist started with simple lines and shapes, just like you are doing now. Your journey has just begun, you know.
If you're curious to learn more about drawing techniques, we have plenty of resources on our site. You can also find more inspiration and tips by visiting a site like Art for Kids Hub for more simple drawing ideas, or even explore other topics like how to draw animals, you know. The sky's the limit for what you can create, pretty much!
Aeroplane Images For Drawing Easy Step By Step - Infoupdate.org

Free Aeroplane Drawing, Download Free Aeroplane Drawing png images

Free Aeroplane Drawing, Download Free Aeroplane Drawing png images
